.png)

Tutorial to Create Fake Miniature Effect
 at 11:20 pm
 0 comments
 at 11:20 pm
Today, I was doing housekeeping of my photography website and I stumbled upon some old miniature photographs that I had learnt to create years back. So I scrambled through my old notes, and going to share the tutorial to create miniature effect with everyone.

In this tutorial, I will use an old photograph that is taken from Marina Bay Sands. Please note that the instruction is based on my Adobe Photoshop CS4 version. If you have newer versions, the functionalities and techniques is the same.
 With the duplicated layer selected in the Layer Panel, go to menu bar: Layer -> Layer Mask -> Reveal All. Alternatively, you can click on the Layer Mask icon in the Layer Panel to do so (as shown on the right).
 Select the created layer mask from the layer panel.
With the layer mask selected, select the gradient mask tool and set it to "Reflected Gradient" with a black gradient foreground and white gradient background as shown below.

Next, draw a straight vertical gradient on your photo on the area where you want to have the "miniature" effect to be in focus. In my case, I wanted the porch in front of the Esplanade (with people around) and part of the Esplanade to be "in focus".

(Note: The gradient mask can be adjusted at any point of time later by just going through Step 3.)
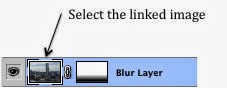 Now, from the Layer Panel, select the linked image that is next to the layer mask where you have created the gradient.
Once the linked image is selected, select Gaussian Blur filter from the menu bar: Filter -> Blur -> Gaussian Blur
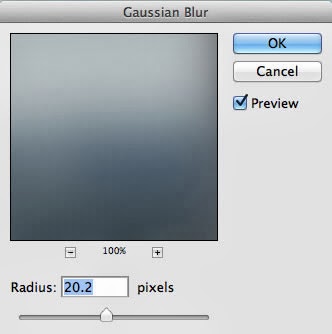
A Gaussian Blur dialogue box will be shown. Adjust the radius to an appropriate level where the foreground and background is blurred.
As the radius is adjusted, you should be able to see the effect on the image in your screen with the "Preview" turned on.
(Note: I typically work within 15-20 radius. Still it is case-to-case depending on your photograph.)
 Now that the gaussian blur has been applied, a new Hue/Saturation adjustment layer needs to be added. From the menu bar: Layer -> New Adjustment Layer -> Hue/Saturation. Once that is done, the adjust panel would up. Simply adjust the slider for the saturation to the right.
The final miniature effect would look something like the picture below. Try create your own miniature effect and have fun!

Please visit http://jefzlim.smugmug.com/Themes/Miniature for more photos ...
Real miniature pictures can be taken through tilt-shift lenses that allow both the foreground and background to be blurred based the angle on the plane of focus. If you do not have a tilt-shift lenses just like me, the miniature can still be created using photoshop techniques during post-processing.
All photographs can be turned into a miniature effect, but not all types of photographs are suitable. Typically I find that a picture of a busy street with peoples, buildings or objects makes nice looking miniature. The picture also has to be taken from a distance and an elevated angle, for the miniature effect to be stronger.What Types of Photograph Is Suitable for Miniature Effect?
Tutorial: Step-by-Step Instruction Using Photoshop
Miniatures photographs exhibit two key characteristics: (1) strong Depth of Field (DOF) with a blurred foreground and background, and (2) strong saturation of colors. This is exactly the 2 keys steps that will need to be applied to the picture using photoshop.In this tutorial, I will use an old photograph that is taken from Marina Bay Sands. Please note that the instruction is based on my Adobe Photoshop CS4 version. If you have newer versions, the functionalities and techniques is the same.
Step 1: Create a duplicated copy of the photograph
Once the photograph, a duplicate copy of the photograph needs to be created. Easily done through menu bar: Layer -> Duplicate Layer. Give your layer a name (e.g. "Blur Layer").Step 2: Create a Layer Mask on the Duplicated Layer
Step 3: Create a Reflected Gradient on the Layer Mask
Select the created layer mask from the layer panel.With the layer mask selected, select the gradient mask tool and set it to "Reflected Gradient" with a black gradient foreground and white gradient background as shown below.
Next, draw a straight vertical gradient on your photo on the area where you want to have the "miniature" effect to be in focus. In my case, I wanted the porch in front of the Esplanade (with people around) and part of the Esplanade to be "in focus".
(Note: The gradient mask can be adjusted at any point of time later by just going through Step 3.)
Step 4: Create a Gaussian Blur on the Image
Now, from the Layer Panel, select the linked image that is next to the layer mask where you have created the gradient.Once the linked image is selected, select Gaussian Blur filter from the menu bar: Filter -> Blur -> Gaussian Blur
A Gaussian Blur dialogue box will be shown. Adjust the radius to an appropriate level where the foreground and background is blurred.
As the radius is adjusted, you should be able to see the effect on the image in your screen with the "Preview" turned on.
(Note: I typically work within 15-20 radius. Still it is case-to-case depending on your photograph.)
Step 5: Final Step to Add Strong Saturation to the Image
Please visit http://jefzlim.smugmug.com/Themes/Miniature for more photos ...


