Open top menu
9 Nov 2013
Chasing Stars ... Trails

I have been chasing stars for the past one month. Not movie stars but stars in the sky.

Many had wondered whether shooting star trails in a bright island like Singapore is possible. Not only that, our skies are usually cloudy and rarely clear. Despite these adverse conditions, shooting star trails is definitely possible in Singapore.

Shooting star trails has never been easy in the month of October and November when the weather is usually wet and the sky is always cloudy. Whenever there is an opportunity of good weather at night, I would get out of the home and try out at various locations/timings with different camera settings.
Star trail taken at Sentul Crescent. 121 photographs stacked (ISO 100, F/4, 30 secs). 

Based on my research and experience so far, I've put together a list of recommendations on how to take star trails in Singapore to help any enthusiast who would like to do so.

Equipment Needed

Camera

Camera that is capable of shooting in long exposure.

Fast Lenses

Fast lenses with wide aperture (i.e. smallest F-number that you can get). It does not matter whether it is a wide-angle lens or zoom lens as it only affects your field of view. However, you may want to take note that using a lens with longer focal length can capture a longer trail given the same amount of time as captured with a shorter focal length.

Tripod

As the star trail is shot on long exposure over a rather long period of time, a steady tripod would be required. If shooting in the open, additional weights to weight down the tripod may be required to reduce potential shakes on camera caused by strong wind (if any).

Remote Trigger

Wired remote trigger that is capable of locking the shutter press. This is necessary as multiple long exposure photographs will be taken in continuous shooting mode over a long period of time. Alternatively an intervalometer should be used if you intend to have exposure of each photograph longer than 30 seconds.

Star trail taken at Sentul Crescent. 135 photographs stacked (ISO 400, F/4, 30 secs). 

Techniques, Camera Settings and Parameters

Capturing star trails requires long exposure of 30 seconds or longer. In a bright island like Singapore, there are 2 problems that one would face while trying to capture star trails. 
  • First, the stars are barely visible to our eyes. Fact is that there are many stars which is not visible to our naked eye but can be captured on the sensitive camera sensor over time. The settings on the camera needs to be sensitive enough to pick up the stars which is least bright in the sky.
  • Second, a very long exposure could easily wash out the picture as our skies are bright. Hence it is difficult but important to make the balance of having sensitive enough settings and yet not over-exposing the picture taken.

Shoot In JPEG Instead of RAW

The entire technique will require taking multiple long exposure shot over time, and stacking the photographs together to show the star trail. Hence shooting in JPEG will give a smaller file size which take up less space and less resource intensive on your computer during the stacking time.

Aperture

The aperture need to be as wide open as possible with the smallest F-number used. This will enable more light to be taken in onto the sensor so that even the least bright star can be captured.

Exposure Time

An exposure time of 30 seconds is recommended for each photograph. This will enable a sufficient trail of the star to be captured, and a duration of 15mins with 30 seconds exposure interval should give you quite a fair bit of star trails. The other reason for 30 seconds is that the camera does not need to go into bulb mode, where continuous shooting will require require an intervalometer.

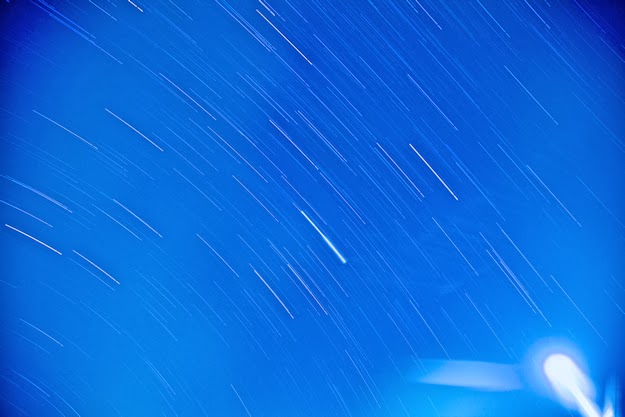
Note: The longer the exposure, the longer the star trail. To have a hyper long exposure in a single shoot without the picture being washed out would mean that aperture needs to be as small as possible and ISO as low as possible, which does not work out in our bright sky. Based on my experiments (see picture below), a single exposure of 10 mins does not pick up as many star trails as compared to 40 exposures of 30 secs.
Star trail taken at Riverside Walk. Single long exposure ISO 100, F/4, 600 secs). 
ISO

This is a tricky setting that needs to be balanced. Although the sensor needs to be as sensitive to light as possible, high ISO will introduce more noise to the picture taken, not to mention even more noise from long exposure.

With the aperture wide-open and high ISO used, the exposure time may be too short to capture a proper length of the star trail. Based on my experiments so far, an ISO of 400 is about right without over-exposing the picture and yet sensitive enough to pick up the light from the stars.

Continuous Drive/Shooting Mode

The camera needs to be continuous shooting over the entire period of time (e.g. 1 hour of 30 seconds exposure for each photograph). In order not to have "breaks" in between due to the camera processing the photograph after 30 seconds, you will need a wired remote trigger that is capable of locking the shutter press throughout the entire period.

White Balance Set to Tungsten

If taking pictures in JPEG (even if you are not), it is best to set the white balance to tungsten. Believe it or not, our bright skies are "lighted" with the city lights which are of yellowish/orange tint. Setting to Tungsten will make your sky more 'blue'.

Take Test Shots

While adjusting your settings and taking test shot, I strongly suggest that ISO should be the parameter to be first varied with when required i.e. if the picture is over-exposed with the widest aperture over 30 seconds, then stop-down the ISO.

The star trails will not be visible on the LCD display of the camera. You will need to zoom in 100% on the LCD display to see the little trails. This is a good way to see if the sky is too cloudy for capturing star trails.

Understanding Directions of Star Trails

Semi-Circular Star Trail Patterns at True North/South Pole

Stars will have a semi-circular trail if pointing at True North or South Pole. Singapore is located near the equator with a latitude of about 1°. This means that we will never get a full circular star trail. The best we can get is a semi-circle star trail pointing at True North, and slightly less than a semi-circle star trail pointing at True South.

It is important to note that True North/South is different from the Magnetic North/South which is our typical compass. The angle of difference between True and Magnetic North/South is known as the magnetic declination which can be computed at http://www.ngdc.noaa.gov/geomag-web/#declination. Please note that magnetic declination does vary over time.

Therefore, if you want a circular star trail, simply point towards the Magnetic North/South as indicated in your magnetic compass and offset it by the amount of magnetic declination. At the time of writing this article, the magnetic declination is 0° 13' 3"East i.e. Magnetic North is 0° 13' 3" east of True North (and similar computation for South).

Stars has an anti-clockwise trail when pointing towards True North, and clockwise trail in the True South. Based on my research and observation, the stars will take at least 6-8 hours to move across the horizons from left to right.

Vertical Star Trail Patterns at East or West

If you are pointing towards East or West, the star trails will appear vertical in your picture frame. If your lens is wide enough, the star trails on the extreme left of your picture frame will appear to bend towards the top left edge while the star trails on the extreme right of your picture frame will appear to bend towards the top right edge.

The star trail will look something like the following if taken pointing towards NorthEast direction.
Star trail taken at Punggol Drive. 67 photographs stacked (ISO 400, F/4, 30 secs). 

Stacking Your Star Trails Photographs

Once all your photographs have been taken, you will need to stack them in Photoshop so that the star trail will appear in a single photograph. The following are the keys steps to stack them using Photoshop:
  • From Photoshop, select Files --> Scripts --> Load Files Into Stack ...
  • Select all the star trail photographs that you have taken and click 'OK'. This process will take relatively long time to complete depending on the number of photographs you have and system resources (i.e. CPU speed, memory, etc.)
  • Once all the photographs are loaded into stack which you can see each photograph as a layer, you will need to change the Blending Mode for each layer to 'Lighten'. As the layers are blended and lighten, the star trail will appear.
  • Merge all the layers into one and you have your star trail picture.
Note: I'm not providing a detailed instruction here as there are many resources in the Internet that you can googled which will show you how to. 

Other Things to Note

  • Avoid taking star trails in extremely "early hours" in the night e.g. beyond 1am. This is because the weather will turn cold and dew will start to condense on the surface of your lens which will ruin your shots.
  • Please be extremely careful if you are going to a location which is dark and deserted. You definitely do not want anything to happen such as robbery or bitten by wild dogs, etc.
Star trail taken at Sentul Crescent. 46 photographs stacked (ISO 200, F/4, 30 secs). 

Please visit http://jefzlim.smugmug.com/Themes/Star-Trails to see the higher resolution and full size image of the star trails that I've taken.


Read more
8 Nov 2013
Creating An Urban Montage

I was reading one of my photography magazine and came across an article about creating an urban montage. The technique was easy and so I gave it a try. To my surprise, I really like the outcome as it look like an art piece.
Picture taken at Universal Studio Singapore. Click on it to see the higher resolution full size picture.

Steps to Create the Montage

1. Choose a picture - I had gone through and tried on various types of photographs, and find that the montage looks great with vibrant pictures of landscape or cityscape that have quite a fair bit of details. (That's my opinion - feel free to try out whatever seems good to you :)

2. Use Photoshop to duplicate 12 additional copies (layers) of the picture, with each layer rotated incrementally at 30-degrees. In other words, you will have 6 of layers rotated at 30, 60, 90, 120, 150 and 180 in clockwise direction, and the other 6 layers rotated in similar angles in anti-clockwise direction.
(Note: Any angle of rotation can be use, and it doesn't need to have 12 additional copies. In my case, I followed the magazine because 12 copies of 30-degree rotation each will complete a 360-degree rotation.)

3. Set the blending mode for each of the 12 layers to "Soft Light". Lower the opacity of each layer if the montage looks a little too overwhelming after the blending.

4. Shift and move each layer around to create the montage. There is no science to this - it is all dependent on you playing around and shifting each layers to give the desired montage "look" of your picture.


That's all! Simple technique that can create really beautiful artistic looking pictures. Try it out :)


Read more
7 Nov 2013
Make Sequence Photographs Into A Collage

I made a photo collage of a bee moving around the flower gathering nectar taken at Fort Canning Park yesterday which I had almost discarded them.
(Please visit http://jefzlim.smugmug.com/Destinations/Singapore/Fort-Canning-Park for the higher resolution picture of the collage …)

The photographs were taken from quite a distance away from the flower in the bush which I had tried to reach it with my 100mm macro lens on my cropped camera body (500D). As such the bee was looking really small in my original size photograph (see picture below). 

The original size of the picture taken with my EOS 500D has a resolution of 4752 x 3368. Even if the original size photographs are cropped to 1/3 the size, the bee would still be too small in proportion and will look uninteresting in the picture. If I further cropped it beyond 1/3 the size for a close-up, the resolution of the picture would not make it to my photography website (which anyway would probably be unsuitable resolution for prints).

If you ever had a similar situation, especially where there is a sequence of "activities" in the photographs, you can still cropped them for a close-up and collage them into a single picture with image which can produce interesting sequence of activities.

The photo collage would look more interesting and would help viewers to focus on the different movement or "activities" of the subject if each picture in the collage is showing exactly the same picture composition. It can be achieved by taking the sets of photographs with the camera secured on a tripod. If you do not have a tripod, try to maintain at least the same picture composition.


Read more
6 Nov 2013
Art Painting Your Park (Fort Canning)

Weather is good this morning, and I went out searching for a inspirational topic that I could work on at Fort Canning Park which I last came here 5 years ago. Not before long after taken only a small handful of photographs, I had to end my field trip as my shoe sole has given way on me.

Fort Canning Park is one of Singapore's most historic landmarks where many ancient artefacts still remain amidst the lush greenery park. Besides the usual flowers and insects/bugs expected of a park, the Fort Canning Park has many other interesting photography subjects such as burial grounds, ancient grave stones, fort gate, battle bunkers, art sculptures and old huge trees.

Standing in the middle of Fort Canning Green, I couldn't help admiring how majestic the huge trees was looking on a green field against the blue sky. The idea of making this entire scene into an art painting struck me.

Does the picture above looks like a beautiful art/oil painting? Turning photographs into an art painting look-alike picture can be done easily by taking bracketing shots of the scene and generating the photographs taken into a single HDR (High Dynamic Range) picture using software programs.

Taking Bracketing Photographs

  • In bracketing, typically 3 identical photographs are taken with different exposure - normal, over-exposed and under-exposed. The amount of "over" or "under" exposure stops is defined in the bracketing function menu which can be accessed from the camera's function menu.
  • It is easier to take the bracketed shots in Aperture Priority (Av) Mode. Adjust the aperture that you want the shots to be taken with.
  • Before taking the 3 bracketed shots, switch the shutter drive mode to multiple shots so that you can just hold the shutter for the 3 shots to be taken. It is best to have a tripod so that the composition of the scene is the same, otherwise it may cause some problems when generating the HDR picture.

Converting to HDR

  • It is easiest to convert bracketed photographs to HDR using software programs such as Photomatix Pro which I'm using. These programs do most of the "stacking" job, and leaves the final adjustment of the picture to you.
  • To make it look more like an art painting, I made further manual adjustment to the generated HDR image by increasing the strength of the dynamic details, color saturation, luminosity and micro-contrast.
Here is another "painting" which I had took from the wall of gravestones along the stairs. I've converted the painting into black and white, and painted color over the walls and stairs.

Please visit http://jefzlim.smugmug.com/Destinations/Singapore/Fort-Canning-Park for more photos …


Read more
5 Nov 2013
Bacteria on Extreme Macro Photography

Exactly a week ago, I started cultivating some bacteria using agar-agar in a petri dishes. Originally, I had wanted to take time-lapse photographs of the bacteria growth over time but gave up after 3-days when I did not see any progress. I had then chuck the petri dishes into the corner of my drawer.

So today I actually wanted to throw away the petri dishes and try cultivating the bacteria again for my time-lapse photographs, but noticed that are small colonies of bacteria growing in the petri dishes - I was thrilled. Having tried out extreme macro photography yesterday, I thought this might also be a good subject for it.

So here are the beautiful (or disgusting to some) extreme close-up photographs growing on the agar-agar in the petri dishes which you typically will not see with naked eyes. Pictures is at 25% magnification only. Please visit http://jefzlim.smugmug.com/Studio-Works/Extreme-Macro-Photography for the higher resolution and magnification of the photos …


The bacterias were cultivated based on sampling from 3 areas: (1) Car Steering Wheel, (2) Keyboard and (3) Rubbish Chute.

How I Cultivated the Bacteria ...

I must state clearly that cultivating bacteria is very dangerous as we definitely do not want to be infected by unknown bacterias. I'm not a scientist and whatever I'm experimenting with is based on what I'd had research and read from Internet. So if you are interested to also experiment with it, please make sure that you do sufficient research on the steps and risk involved, as well as all safety measures to protect yourself!

Items You Need

1. Petri dishes - you can get a dozen from ArtFriend at somewhere around $10.

2. Nutrient Agar - According to what I researched, all agars are actually gelatinous substance obtained from algae found in seaweeds. The difference of a "nutrient" agar is that it contains some percentage of beef/yeast extracts. As I could not find "Nutrient" Agar in supermarket or anywhere, I had used the normal agar-agar which we used to make desserts. 

3. Cotten Bud - For swabbing on areas where you want to sample the bacteria growth.

4. Sealing Tape or Masking Tape - this is to seal off the petri dishes.

The Steps to Cultivate

1. Mix the agar powder with water and cook to boil. Once boil, fill the petri dish to the mid-point with the liquid-form agar. Leave to cool down and solidify. They should be solidify within half an hour.

2. Take a cotton bud and swab around a target area which you would like to sample the bacteria (e.g. keyboard).

3. Once the agar is cooled down and solidify, take the cotton bud that has been swabbed and swab it across the surface of the agar. (Note: You may want to label your petri dish if sampling on various areas.)

4. Close the petri dish and seal it off with the sealing tape. Never to be opened again.

5. Bacteria grows in warm, moist and dark areas. So, store the petri dish in places such as the top of the refrigerator. Places the petri dish in turn-over position will help to keep the moist within. 

6. According to what I know, the bacteria should start growing in 2-3 days. In my case, nothing was found growing on the surface of the agar after 3 days which I'm suspecting could be due to the use of normal agar versus nutrient agar.

7. Dispose the entire petri dish after you have done your experimentation.


Read more
4 Nov 2013
Trying Out Extreme Macro Photography Using Still Life Object

Today, I took on extreme macro photography at home since it was raining for most part of the afternoon. Although I've a brief idea on how it works, I've never try it before.

What is Extreme Macro Photography?

One should know that macro photography is a close-up photography of tiny subjects to reproduce life-size magnification using macro lenses. However, if there is a subject which is so tiny that even the best macro lens cannot produce a close-up life-size magnification, then extreme macro photography could help to do so.

Uses of Extreme Macro Photography

Many uses extreme macro photography on insects and bugs. This YouTube video will show you how this guy makes use of it to produce beautiful, breathtaking and amazing close-up pictures of insects and bugs.

While I'm inspired by him to also take pictures of insects/bugs using extreme macro photography, I wanted to understand more about the challenges and trade-offs by experimenting it on static objects first.

How to Take Extreme Macro Photographs

Based on my knowledge, there are typically 2 ways on how extreme macro photography can be done:
  • The 1st method is to attached a prime lens in a inverted manner to the camera using a reverse ring with filter threads i.e. the typical front of lens will be mounted onto the camera instead.
  • The 2nd method (which I've used) is to stacked 2 lenses together. The 1st lens will be attached as per normal to the camera, while the 2nd lens will be inverted and attached to the 1st lens using reverse ring with filter threads.  The shorter lens is typically used as the inverted lens as the magnification factor is equivalent to the focal length of the 1st lens divided by the focal length of the 2nd inverted lens.

Focusing Using Inverted lens?

Based on 2nd method, both the inverted and non-inverted lenses will be set to Manual Focus (MF) with a focusing distance set to infinity. To focus, simply move/adjust the distance of the entire camera nearer or farther away from the subject by looking through the view finder.

What are the Challenges and Trade-Offs?

#1: The magnification will be so amplified with the inverted lens that the focusing distance to the subject is only about 2-3 cm from the tip of the lens. At this point, I really wonder how to take extreme macro photography of insects/bugs without them fleeing away at such a distance. In fact, I really admire those who did it.

#2: With such magnification, any slightest movement and you could be out of the point that you want to focus on. This however can be overcome if the camera is using a macro focusing rail on tripod.

#3: The Depth of Field (DOF) is very shallow. Even going on small aperture like (F/16), the DOF is probably about 1mm only.

Results of My Extreme Macro Photography Using Static Objects

So I had my camera and lenses setup on a tripod (without macro focusing rail). To focus, I had to manually hold the object with one hand at a 2-3cm distance from the tip of the lenses, and adjusting the distance of the object while looking through the view finder for the focus point that I wanted. I had the other hand triggering off the shot using a remote trigger.

The following pictures are my results - each picture is equivalent to a width of 4mm in real-life at only 50% magnification. See if you can tell what are them :) (Tips: Move mouse over image for the description of image.)

Toothbrush
Blades of Philips AquaTouch Shaver
Thumb wheel of a Lighter
Old Earpiece
Scotch Brite Sponge
Pen Tip of Blue Highlighter
Zipper of a Wallet
Grains of Ginger Tea Premix Pack
Band-Aid (or First Aid Band)
Edge of a Fruit Knife
Surface of Cream Biscuit

Please visit http://jefzlim.smugmug.com/Studio-Works/Extreme-Macro-Photography to see a large view and magnification of the photos …


Read more