.png)
 By
By  at 5:57 pm
Many had wondered whether shooting star trails in a bright island like Singapore is possible. Not only that, our skies are usually cloudy and rarely clear. Despite these adverse conditions, shooting star trails is definitely possible in Singapore.
Shooting star trails has never been easy in the month of October and November when the weather is usually wet and the sky is always cloudy. Whenever there is an opportunity of good weather at night, I would get out of the home and try out at various locations/timings with different camera settings.

Star trail taken at Sentul Crescent. 121 photographs stacked (ISO 100, F/4, 30 secs).
Based on my research and experience so far, I've put together a list of recommendations on how to take star trails in Singapore to help any enthusiast who would like to do so.
Equipment Needed
Camera
Camera that is capable of shooting in long exposure.
Fast Lenses
Fast lenses with wide aperture (i.e. smallest F-number that you can get). It does not matter whether it is a wide-angle lens or zoom lens as it only affects your field of view. However, you may want to take note that using a lens with longer focal length can capture a longer trail given the same amount of time as captured with a shorter focal length.
Tripod
As the star trail is shot on long exposure over a rather long period of time, a steady tripod would be required. If shooting in the open, additional weights to weight down the tripod may be required to reduce potential shakes on camera caused by strong wind (if any).
Remote Trigger
Wired remote trigger that is capable of locking the shutter press. This is necessary as multiple long exposure photographs will be taken in continuous shooting mode over a long period of time. Alternatively an intervalometer should be used if you intend to have exposure of each photograph longer than 30 seconds.

Star trail taken at Sentul Crescent. 135 photographs stacked (ISO 400, F/4, 30 secs).
Techniques, Camera Settings and Parameters
Capturing star trails requires long exposure of 30 seconds or longer. In a bright island like Singapore, there are 2 problems that one would face while trying to capture star trails.
- First, the stars are barely visible to our eyes. Fact is that there are many stars which is not visible to our naked eye but can be captured on the sensitive camera sensor over time. The settings on the camera needs to be sensitive enough to pick up the stars which is least bright in the sky.
- Second, a very long exposure could easily wash out the picture as our skies are bright. Hence it is difficult but important to make the balance of having sensitive enough settings and yet not over-exposing the picture taken.
Shoot In JPEG Instead of RAW
The entire technique will require taking multiple long exposure shot over time, and stacking the photographs together to show the star trail. Hence shooting in JPEG will give a smaller file size which take up less space and less resource intensive on your computer during the stacking time.
Aperture
The aperture need to be as wide open as possible with the smallest F-number used. This will enable more light to be taken in onto the sensor so that even the least bright star can be captured.
Exposure Time
An exposure time of 30 seconds is recommended for each photograph. This will enable a sufficient trail of the star to be captured, and a duration of 15mins with 30 seconds exposure interval should give you quite a fair bit of star trails. The other reason for 30 seconds is that the camera does not need to go into bulb mode, where continuous shooting will require require an intervalometer.
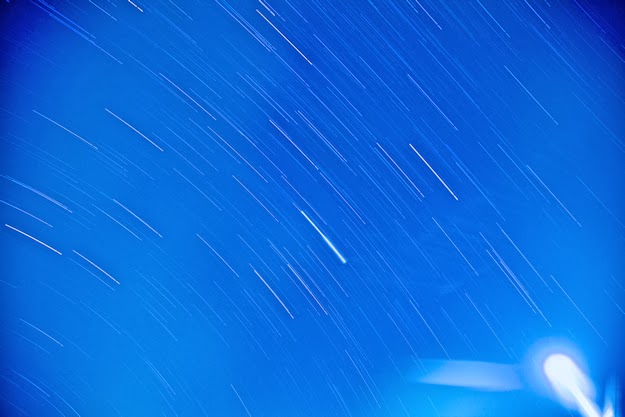
Note: The longer the exposure, the longer the star trail. To have a hyper long exposure in a single shoot without the picture being washed out would mean that aperture needs to be as small as possible and ISO as low as possible, which does not work out in our bright sky. Based on my experiments (see picture below), a single exposure of 10 mins does not pick up as many star trails as compared to 40 exposures of 30 secs.
 Star trail taken at Riverside Walk. Single long exposure ISO 100, F/4, 600 secs).
 ISO
This is a tricky setting that needs to be balanced. Although the sensor needs to be as sensitive to light as possible, high ISO will introduce more noise to the picture taken, not to mention even more noise from long exposure.
With the aperture wide-open and high ISO used, the exposure time may be too short to capture a proper length of the star trail. Based on my experiments so far, an ISO of 400 is about right without over-exposing the picture and yet sensitive enough to pick up the light from the stars.
Continuous Drive/Shooting Mode
The camera needs to be continuous shooting over the entire period of time (e.g. 1 hour of 30 seconds exposure for each photograph). In order not to have "breaks" in between due to the camera processing the photograph after 30 seconds, you will need a wired remote trigger that is capable of locking the shutter press throughout the entire period.
White Balance Set to Tungsten
If taking pictures in JPEG (even if you are not), it is best to set the white balance to tungsten. Believe it or not, our bright skies are "lighted" with the city lights which are of yellowish/orange tint. Setting to Tungsten will make your sky more 'blue'.
Take Test Shots
While adjusting your settings and taking test shot, I strongly suggest that ISO should be the parameter to be first varied with when required i.e. if the picture is over-exposed with the widest aperture over 30 seconds, then stop-down the ISO.
The star trails will not be visible on the LCD display of the camera. You will need to zoom in 100% on the LCD display to see the little trails. This is a good way to see if the sky is too cloudy for capturing star trails.
Understanding Directions of Star Trails
Semi-Circular Star Trail Patterns at True North/South Pole
Stars will have a semi-circular trail if pointing at True North or South Pole. Singapore is located near the equator with a latitude of about 1°. This means that we will never get a full circular star trail. The best we can get is a semi-circle star trail pointing at True North, and slightly less than a semi-circle star trail pointing at True South.
It is important to note that True North/South is different from the Magnetic North/South which is our typical compass. The angle of difference between True and Magnetic North/South is known as the magnetic declination which can be computed at http://www.ngdc.noaa.gov/geomag-web/#declination. Please note that magnetic declination does vary over time.
Therefore, if you want a circular star trail, simply point towards the Magnetic North/South as indicated in your magnetic compass and offset it by the amount of magnetic declination. At the time of writing this article, the magnetic declination is 0° 13' 3"East i.e. Magnetic North is 0° 13' 3" east of True North (and similar computation for South).
Stars has an anti-clockwise trail when pointing towards True North, and clockwise trail in the True South. Based on my research and observation, the stars will take at least 6-8 hours to move across the horizons from left to right.
Vertical Star Trail Patterns at East or West
If you are pointing towards East or West, the star trails will appear vertical in your picture frame. If your lens is wide enough, the star trails on the extreme left of your picture frame will appear to bend towards the top left edge while the star trails on the extreme right of your picture frame will appear to bend towards the top right edge.
The star trail will look something like the following if taken pointing towards NorthEast direction.
Star trail taken at Punggol Drive. 67 photographs stacked (ISO 400, F/4, 30 secs).
Stacking Your Star Trails Photographs
Once all your photographs have been taken, you will need to stack them in Photoshop so that the star trail will appear in a single photograph. The following are the keys steps to stack them using Photoshop:
- From Photoshop, select Files --> Scripts --> Load Files Into Stack ...
- Select all the star trail photographs that you have taken and click 'OK'. This process will take relatively long time to complete depending on the number of photographs you have and system resources (i.e. CPU speed, memory, etc.)
- Once all the photographs are loaded into stack which you can see each photograph as a layer, you will need to change the Blending Mode for each layer to 'Lighten'. As the layers are blended and lighten, the star trail will appear.
- Merge all the layers into one and you have your star trail picture.
Note: I'm not providing a detailed instruction here as there are many resources in the Internet that you can googled which will show you how to.
Other Things to Note
- Avoid taking star trails in extremely "early hours" in the night e.g. beyond 1am. This is because the weather will turn cold and dew will start to condense on the surface of your lens which will ruin your shots.
- Please be extremely careful if you are going to a location which is dark and deserted. You definitely do not want anything to happen such as robbery or bitten by wild dogs, etc.

Star trail taken at Sentul Crescent. 46 photographs stacked (ISO 200, F/4, 30 secs).
Please visit http://jefzlim.smugmug.com/Themes/Star-Trails to see the higher resolution and full size image of the star trails that I've taken.


0 comments